I learned early on in my software career that packaging up a release of an application can be a real pain. Not only is it time consuming, but it is quite easy to forget a file or miss something when there are so many steps involved and you have to do it frequently. The solution to this is to automate the process. Putting together scripts to package up a release helps avoid missing steps and speeds up development and deployment of releases and updates.
One of the challenges of automating this on Mac OS X is figuring out how to script the creation of Apple disk image (DMG) files. Getting the arguments to hdiutil correct can be quite a challenge! In this post, I’ll give an example of a script I use to do the following:
- Copy all the necessary files to a staging area
- Strip and compress the executable files and libraries
- Create a DMG of the correct size for the release
- Add a link to /Applications to the DMG
- Add a background to the DMG so when it opens up your company logo or application graphic appears
- Check the background image’s DPI to ensure it is 72. Fix it if it’s not.
- Resize the window and icons, and position items in the DMG so when it opens everything is in the right place
- Create a final, compressed DMG
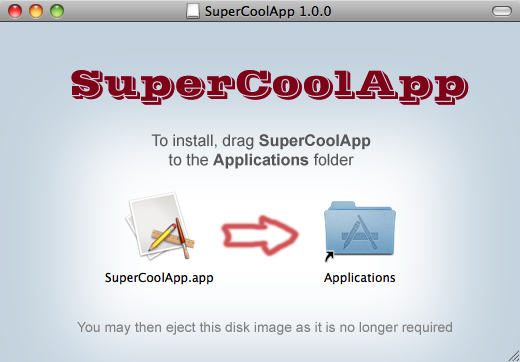
Packaging An Application Using a DMG
Let’s take a look…
I like to create a double-clickable file to run the bash script so I can just run it from the Finder instead of using Terminal. To do that, simply name the file with the extension .command and make sure it is executable (run “chmod +x fileName.command” in the terminal).
(These are the files used in this example: Packaging_Example.zip. They are also available at the end of this post.)
This first part of the bash script sets up the names and locations of files we’ll be using throughout. If you are going to use this script for your own project, you’ll need to change several of the variables near the top.
|
1 2 3 4 5 6 7 8 9 10 11 12 13 14 15 16 17 18 19 20 |
#!/bin/bash # make sure we are in the correct dir when we double-click a .command file dir=${0%/*} if [ -d "$dir" ]; then cd "$dir" fi # set up your app name, version number, and background image file name APP_NAME="SuperCoolApp" VERSION="1.0.0" DMG_BACKGROUND_IMG="Background.png" # you should not need to change these APP_EXE="${APP_NAME}.app/Contents/MacOS/${APP_NAME}" VOL_NAME="${APP_NAME} ${VERSION}" # volume name will be "SuperCoolApp 1.0.0" DMG_TMP="${VOL_NAME}-temp.dmg" DMG_FINAL="${VOL_NAME}.dmg" # final DMG name will be "SuperCoolApp 1.0.0.dmg" STAGING_DIR="./Install" # we copy all our stuff into this dir |
This script assumes that the .command file, SuperCoolApp.app, and Background.png are all in the same folder. It also assumes that the actual executable in the application bundle (in Contents/MacOS ) is the same name as the .app.
After the setup, the first thing we need to do is check the background image’s dots-per-inch (DPI) settings. On the Mac, anything other than 72 DPI will result in a distorted background image when opening the DMG on Mac OS X 10.7+.
Background image with DPI of 90 on Mac OS X 10.8
To fix this, we use the built-in scriptable image processing system command line tool (sips) to check the DPI and convert the image file if necessary.
As Brett noted in the comments, some versions of the sips tool seem to have a bug that will not convert the DPI if the format is JPEG. So you may need to use a workaround or modify the script to output a different format from the input file.
|
1 2 3 4 5 6 7 8 9 10 11 12 13 14 |
# Check the background image DPI and convert it if it isn't 72x72 _BACKGROUND_IMAGE_DPI_H=`sips -g dpiHeight ${DMG_BACKGROUND_IMG} | grep -Eo '[0-9]+\.[0-9]+'` _BACKGROUND_IMAGE_DPI_W=`sips -g dpiWidth ${DMG_BACKGROUND_IMG} | grep -Eo '[0-9]+\.[0-9]+'` if [ $(echo " $_BACKGROUND_IMAGE_DPI_H != 72.0 " | bc) -eq 1 -o $(echo " $_BACKGROUND_IMAGE_DPI_W != 72.0 " | bc) -eq 1 ]; then echo "WARNING: The background image's DPI is not 72. This will result in distorted backgrounds on Mac OS X 10.7+." echo " I will convert it to 72 DPI for you." _DMG_BACKGROUND_TMP="${DMG_BACKGROUND_IMG%.*}"_dpifix."${DMG_BACKGROUND_IMG##*.}" sips -s dpiWidth 72 -s dpiHeight 72 ${DMG_BACKGROUND_IMG} --out ${_DMG_BACKGROUND_TMP} DMG_BACKGROUND_IMG="${_DMG_BACKGROUND_TMP}" fi |
Next we remove any old data, create the staging directory, and copy over all the stuff we want in the final DMG file.
|
1 2 3 4 5 6 7 |
# clear out any old data rm -rf "${STAGING_DIR}" "${DMG_TMP}" "${DMG_FINAL}" # copy over the stuff we want in the final disk image to our staging dir mkdir -p "${STAGING_DIR}" cp -rpf "${APP_NAME}.app" "${STAGING_DIR}" # ... cp anything else you want in the DMG - documentation, etc. |
Now we strip the symbols out of our executable and, if we have UPX in our path, we run it on the executable as well. (If you aren’t already using UPX, you should take a look. In most cases it will reduce the file size by quite a bit.)
|
1 2 3 4 5 6 7 8 9 10 11 12 13 14 15 16 |
pushd "${STAGING_DIR}" # strip the executable echo "Stripping ${APP_EXE}..." strip -u -r "${APP_EXE}" # compress the executable if we have upx in PATH # UPX: http://upx.sourceforge.net/ if hash upx 2>/dev/null; then echo "Compressing (UPX) ${APP_EXE}..." upx -9 "${APP_EXE}" fi # ... perform any other stripping/compressing of libs and executables popd |
Next, we figure out how big our temporary DMG needs to be by looking at the size of the staging directory, create the DMG, and mount it. The sleep command at the end simply waits for 2 seconds to make sure it’s mounted.
|
1 2 3 4 5 6 7 8 9 10 11 12 13 14 15 16 17 18 19 20 21 |
# figure out how big our DMG needs to be # assumes our contents are at least 1M! SIZE=`du -sh "${STAGING_DIR}" | sed 's/\([0-9]*\)M\(.*\)/\1/'` SIZE=`echo "${SIZE} + 1.0" | bc | awk '{print int($1+0.5)}'` if [ $? -ne 0 ]; then echo "Error: Cannot compute size of staging dir" exit fi # create the temp DMG file hdiutil create -srcfolder "${STAGING_DIR}" -volname "${VOL_NAME}" -fs HFS+ \ -fsargs "-c c=64,a=16,e=16" -format UDRW -size ${SIZE}M "${DMG_TMP}" echo "Created DMG: ${DMG_TMP}" # mount it and save the device DEVICE=$(hdiutil attach -readwrite -noverify "${DMG_TMP}" | \ egrep '^/dev/' | sed 1q | awk '{print $1}') sleep 2 |
Now we set up the contents the way we want them to appear when the DMG is mounted by users. We add a link to /Applications so they can simply drag SuperCoolApp.app over to it, add a background image, and tell the Finder to set up the window size, icon sizes, and icon positions the way we want them.
|
1 2 3 4 5 6 7 8 9 10 11 12 13 14 15 16 17 18 19 20 21 22 23 24 25 26 27 28 29 30 31 32 33 34 35 |
# add a link to the Applications dir echo "Add link to /Applications" pushd /Volumes/"${VOL_NAME}" ln -s /Applications popd # add a background image mkdir /Volumes/"${VOL_NAME}"/.background cp "${DMG_BACKGROUND_IMG}" /Volumes/"${VOL_NAME}"/.background/ # tell the Finder to resize the window, set the background, # change the icon size, place the icons in the right position, etc. echo ' tell application "Finder" tell disk "'${VOL_NAME}'" open set current view of container window to icon view set toolbar visible of container window to false set statusbar visible of container window to false set the bounds of container window to {400, 100, 920, 440} set viewOptions to the icon view options of container window set arrangement of viewOptions to not arranged set icon size of viewOptions to 72 set background picture of viewOptions to file ".background:'${DMG_BACKGROUND_IMG}'" set position of item "'${APP_NAME}'.app" of container window to {160, 205} set position of item "Applications" of container window to {360, 205} close open update without registering applications delay 2 end tell end tell ' | osascript sync |
In this final section, we unmount the temporary DMG, convert it to a compressed, final DMG, and clean up our temporary files.
|
1 2 3 4 5 6 7 8 9 10 11 12 13 14 |
# unmount it hdiutil detach "${DEVICE}" # now make the final image a compressed disk image echo "Creating compressed image" hdiutil convert "${DMG_TMP}" -format UDZO -imagekey zlib-level=9 -o "${DMG_FINAL}" # clean up rm -rf "${DMG_TMP}" rm -rf "${STAGING_DIR}" echo 'Done.' exit |
Running this script by double-clicking the .command file opens Terminal and should give results something like this:
|
1 2 3 4 5 6 7 8 9 10 11 12 13 14 15 16 17 18 19 20 21 22 23 24 25 26 27 28 29 30 31 32 33 34 35 36 37 38 39 40 41 42 43 44 45 46 47 48 49 50 51 52 53 54 55 56 57 58 |
Last login: Mon Jul 22 23:20:05 on ttys002 maloney$ /Users/maloney/dev/Packaging\ Example/Packaging\ Example.command ; exit; ~/dev/Packaging Example/Install ~/dev/Packaging Example Stripping SuperCoolApp.app/Contents/MacOS/SuperCoolApp... Compressing (UPX) SuperCoolApp.app/Contents/MacOS/SuperCoolApp... Ultimate Packer for eXecutables Copyright (C) 1996 - 2013 UPX 3.09 Markus Oberhumer, Laszlo Molnar & John Reiser Feb 18th 2013 File size Ratio Format Name -------------------- ------ ----------- ----------- 125360 -> 53248 42.48% Mach/fat SuperCoolApp Packed 1 file. ~/dev/Packaging Example ....................................................................................................................... ............................................................................... created: /Users/maloney/dev/Packaging Example/SuperCoolApp 1.0.0-temp.dmg Created DMG: SuperCoolApp 1.0.0-temp.dmg Add link to /Applications /Volumes/SuperCoolApp 1.0.0 ~/dev/Packaging Example ~/dev/Packaging Example "disk2" unmounted. "disk2" ejected. Creating compressed image Preparing imaging engine… Reading Protective Master Boot Record (MBR : 0)… (CRC32 $01D574B9: Protective Master Boot Record (MBR : 0)) Reading GPT Header (Primary GPT Header : 1)… (CRC32 $295790C7: GPT Header (Primary GPT Header : 1)) Reading GPT Partition Data (Primary GPT Table : 2)… (CRC32 $9E330484: GPT Partition Data (Primary GPT Table : 2)) Reading (Apple_Free : 3)… (CRC32 $00000000: (Apple_Free : 3)) Reading disk image (Apple_HFS : 4)… ...................................................................................................................... (CRC32 $4AD3CE2F: disk image (Apple_HFS : 4)) Reading (Apple_Free : 5)… ...................................................................................................................... (CRC32 $00000000: (Apple_Free : 5)) Reading GPT Partition Data (Backup GPT Table : 6)… ...................................................................................................................... (CRC32 $9E330484: GPT Partition Data (Backup GPT Table : 6)) Reading GPT Header (Backup GPT Header : 7)… ....................................................................................................................... (CRC32 $3DC52137: GPT Header (Backup GPT Header : 7)) Adding resources… ....................................................................................................................... Elapsed Time: 2.827s File size: 1672568 bytes, Checksum: CRC32 $0C85118D Sectors processed: 6144, 4284 compressed Speed: 757.6Kbytes/sec Savings: 46.8% created: /Users/maloney/dev/Packaging Example/SuperCoolApp 1.0.0.dmg Done. logout [Process completed] |
As with most developer projects, this could use some more error checking… If you release versions of your software frequently, you might want to read the version number from the .plist file instead of having to change it in this script. This is left as an exercise for the reader.
Please let me know in the comments if you find it useful or have any suggestions for improvements!
9 Sep 16: Added a note about the bug in Apple’s sips tool.
9 Nov 14: You may now find it as a gist on github as well.
7 Nov 13: Based on an issue Damien Cassou reported (see comments), added code to check the background image’s DPI and fix it if necessary.
Project Files: Packaging_Example.zip
Thanks for the script! Saved me time and money… I added a couple of lines for codesigning and notarization to get it already for distribution.
You’re welcome! Glad it helped.
Yeah – I wrote this long before they were a thing 😃. If I ever add it I’ll update this post.
Andy – thank you so much, It worked right out of the box and saved me a good deal of time having to reinvent this! My new software, SceneWizard is one more step nearer to being released. I just have to figure out the Windows version – sigh! Did anybody ever tell you it is much easier being a computer science professor than a developer! (Well it was for me).
Hey,
Need some help in running post script command should open the app after we drag and drop.
We can achieve this in package installer, not sure how to proceed the same with dmg, after the user drag and drop, just want to open the app once.
Let us know
After drag and drop, can we close the DMG window.
In testing out your script (thank you by the way, it’s a *huge* help), I noticed that sips seems to have a problem in converting to 72dpi. It only seems to work if you’re changing image formats, as mentioned in this article (and verified through my testing).
https://toyturtle.com/batch-process-images-using-a-shell-script/
Just wanted to mention in case anyone relies on this feature.
Wow – that’s quite an oversight by the sips developers.
Thanks for mentioning it Brett!
Thks for your script and all your explanation, it is really useful!
I had a small issue but I am pretty sure the cause is not your script.
Sometimes when creating the dmg, the background image wasn’t stored or the .DS_Store wasn’t created. I spent a lot of time to try to figure it out. And eventually I got the error message “no space left on device”. It was really strange because the information about the dmg indicates enough of space and inodes to add extra files.
It wasn’t even possible to include an empty extra file.
To bypass the issue, I add an empty DS_Store file and the background image directly in the staging directory.
I think it is maybe a bug in the osx dmg management, I am really interested if you have more information about this.
Jonathan:
I have not run into this yet. One thing I can think of is that the SIZE calculation might be incorrect. When I look at it now, the way I’ve done it feels kind of hacky. I should probably just use stat instead.
I’ve only run this script on 10.9 and 10.10. Are you on 10.11?
I tried to add the empty files mentioned by Jonathan, but still I am facing an error “No space left on device” though I have enough space.
Screenshot for your reference: https://files.fm/u/2gpch3p7#/view/No-Space-Left-On-Device.png
I’m not sure what could be happening, but one quick solution might be to modify the SIZE calculation. Instead of only adding 1M, add 2M.
Is you folder/project at least 1M? If not the SIZE calculation will not work properly. As I mentioned above, this calculation feels like a hack and should be done more intelligently.
Hello.
here is my las comment :o)
I added those lines to your script :
just after that line :
it added an icon, to the dmg file, when it is opened on the desktop.
the icon file is a classic .icns file (there is several tutorial on internet on how to do it)
thanks
Olivier
Thanks Olivier!
If I update this I’ll include this as an option.
Super powerful script!
I suggest to read the app version directly from app. This way you don’t need to modify the script when you package a new version into a DMG file. Here’s I I do it:
I renamed VERSION to APP_VERSION to match the naming scheme from the other computed variable APP_EXE
That’s a great idea Lars! This simplifies things and removes a potential source of error.
The renaming of the variable is also quite appropriate.
Thanks for sharing.
Very nice tutorial. Thanks for demo files…
Thanks Nikola. Glad you found it useful.
Due to the need for backwards compat with Lion, I decided to switch to a Node.js project called
node-appdmg.For developers that are already using MacPorts or homebrew, installing
nodeandnpmis just a few commands.That looks pretty cool Tres – thanks for the update!
For those of you following along at home, you can find node-appdmg here.
What about putting your work on github so that people can contribute and everyone benefit from updates?
You may now find it as a gist on github.
Hello, Awesome Script!
We did just run into a problem when running the script on a non english Mac.
We solved it by adding
LANG=en_GB
to the top of the script.
This info might help some people figuring out why it does not work for them (The calculation of the dmg size fails because we are using , as comma)
Thanks again,
Matthias
Matthias:
That’s a great point! I will add it to the article and the download files when I get a chance.
Thanks a lot for the feedback.
Ok, the fix was to change + 1.0 to + 5.0 when it’s padding the file size (2.0 may have worked too, but this should work good enough to commit to our master branch) 🙂
Thanks again. This script was a huge help without a lot of bloat or reading. 🙂
-Tres
Hi, Thanks for this fantastic script!
It was working fantastically for me and then suddenly stopped yesterday. This is the cryptic message I get:
   could not access /Volumes/LMMS 1.0.0/LMMS.app/Contents/share/

   lmms/themes/default/stepper-right.png - Operation canceled

   hdiutil: create failed - Operation canceled

   Created DMG: LMMS 1.0.0-temp.dmg

   hdiutil: attach failed - No such file or directory

   Add link to /Applications

   -bash: pushd: /Volumes/LMMS 1.0.0: No such file or directory

   ln: ./Applications: File exists

   -bash: popd: directory stack empty

   mkdir: /Volumes/LMMS 1.0.0: No such file or directory

   cp: directory /Volumes/LMMS 1.0.0/.background does not exist

   69:73: execution error: Finder got an error: Can’t get disk "LMMS 1.0.0". (-1728)

   hdiutil: detach failed - No such file or directory

   Creating compressed image

   hdiutil: convert failed - No such file or directory

   Done.
Tres:
It’s hard to tell from that where it’s failing. Obviously this is one of those cases I mention at the end of the article that should have better error checking… Should error out instead of trying to continue.
Did it create the staging dir, strip, and compress it properly?
If you contact me through the contact page we can exchange emails and then I can see the entire output of the script. Might help narrow it down.
Thank you very much. This script helped me a lot. If you are still making changes to the script, you might want to share a gist (http://gist.github.com/) or something. I have one problem though: I can’t make a PNG that looks good as a background in the Finder: it looks like the finder tries to resize my picture, the finder adds a white margin on the right. I took the exact same resolution as your template, but yours always looks good whereas mine always looks bad.
Damien:
You’re welcome! Glad you found it useful.
I haven’t been making any changes, but thanks for the gist suggestion. I’ll take a look.
I’m not quite sure about the problem you’re seeing. I’ve never had the Finder resize my backgrounds. Maybe you can send me the image you’re using and I can try it here? We can connect through my contact page.
Just a note to point out that the problem Damien was seeing had to do with the background image’s DPI.
I added code to check the DPI and fix it if necessary and have updated the post and zip file download above.